Your cart is currently empty!
Author: Munchies Jukebox

Stock Plugins To Create Professional Mixes
Achieve studio-quality results with only Stock Plugins
In the world of music production, the allure of premium plugins is hard to ignore. However, what many producers overlook is the sheer power and potential of stock plugins that come with their DAWs. Whether you use Ableton Live, FL Studio, Logic Pro, or another DAW, your stock plugins are fully capable of producing polished, professional mixes. This guide will show you how to leverage these tools effectively and elevate your tracks.
Fine-tuning frequencies using a stock EQ plugin. A clear demonstration of the power of stock tools like EQ Eight to craft professional soundscapes. What Are Stock Plugins?
Stock plugins are the built-in tools provided with your DAW. They include essential processors like EQs, compressors, reverbs, and delays, as well as creative tools like virtual instruments and modulation effects. While third-party plugins often add versatility, your DAW’s stock options are designed to handle almost every aspect of music production.
Why Use Stock Plugins?
- Cost-Effective: You don’t need to spend extra money to achieve great sound.
- Efficiency: Stock plugins are optimized for your DAW, resulting in better performance.
- Simplicity: They offer intuitive controls that make them easy to learn and use.
Step-by-Step Guide to Mixing with Stock Plugins
1. Start with Clean Recordings
Before diving into your mix, make sure your recordings or samples are clean and free of unnecessary noise. Using high-quality samples like those available from Munchies Jukebox sample packs ensures a solid foundation for your mix.
2. Balancing the Levels
Begin by setting the volume levels of your tracks. This step is crucial for achieving a balanced mix.
- Use your DAW’s channel faders to set each track’s volume.
- Keep the most important elements (like vocals or lead instruments) slightly louder than supporting elements.
3. Use EQ to Sculpt Your Sounds
Equalization (EQ) is one of the most powerful tools in your arsenal. Your DAW’s stock EQ can handle everything from subtle adjustments to dramatic sound shaping.
- High-Pass Filter: Remove low-end rumble from non-bass elements by setting a high-pass filter around 100–200 Hz.
- Frequency Carving: Create space for each instrument by cutting or boosting specific frequencies. For example, cut around 300–500 Hz in your bass to make room for the kick drum.
4. Compression for Consistency
A good compressor is essential for controlling dynamics and adding punch to your mix. Stock compressors are more than capable of delivering professional results.
- Use gentle compression on vocals and instruments to even out volume fluctuations.
- Apply parallel compression on drums to add energy and impact without squashing the sound.
5. Add Depth with Reverb and Delay
Reverb and delay create a sense of space and depth in your mix. Stock plugins often include several reverb types and delay modes.
- Use reverb on vocals or instruments to place them in a virtual space, but be careful not to overdo it.
- Add delay to create rhythmic echoes or widen certain elements in the stereo field.
6. Enhance the Stereo Image
Most DAWs include stock plugins for stereo imaging. Use them to widen or narrow the stereo field of individual tracks.
- Widen pads, backing vocals, or synths to fill out the mix.
- Keep low-frequency elements like kick and bass mono to maintain a strong center.
7. Use Saturation for Warmth
Many DAWs provide stock saturation or distortion plugins that emulate analog warmth.
- Add subtle saturation to vocals, drums, or synths to make them stand out.
- Be careful not to overuse saturation as it can muddy the mix.
Best Use of Stock Plugins
Keep It Minimal
Resist the urge to over-process your tracks. Start with simple adjustments and only add effects as needed.
Leverage Automation
Use your DAW’s automation tools to adjust volume, panning, and effects over time. This makes your mix dynamic and engaging.
Use Reference Tracks
Compare your mix to a professionally produced track in the same genre. This helps you identify areas where your mix can improve.
Upgrade Your Sound with High-Quality Samples
While stock plugins are incredibly powerful, the source material you use also plays a key role. High-quality samples can make mixing easier and more rewarding. Explore Munchies Jukebox sample packs for a wide selection of professionally curated sounds that will elevate your productions.
Final Thoughts
Mixing with stock plugins doesn’t mean compromising on quality. By mastering the tools available in your DAW and following these techniques, you can create professional mixes that compete with industry standards. Start exploring your stock plugins today and unlock their full potential.

Layering Sounds for a Full Mix
Master the art of layering rich, multidimensional tracks that captivate your listeners.
When it comes to producing music that stands out, layering sounds is a critical skill. It’s the secret behind those lush, immersive mixes that feel alive and dynamic. Whether you’re a beginner or a seasoned producer, understanding how to layer effectively can elevate your tracks from ordinary to extraordinary.
In this guide, we’ll explore essential techniques and tips for layering sounds to achieve a full, balanced mix. Let’s dive in!
Layering clap and percussion sounds to create a fuller and more dynamic mix. What is Sound Layering in Music Production?
Sound layering involves combining multiple audio elements to create a more complex and cohesive sound. Instead of relying on a single sound source, you blend layers to add depth, width, and texture to your track.
Why is Layering Important?
Layering helps to:
- Add richness to your track by filling out the frequency spectrum.
- Enhance dynamics, making your music feel more alive.
- Create unique textures that distinguish your sound.
Step-by-Step Guide to Effective Sound Layering
1. Start with a Strong Foundation
Begin with your core sound, whether it’s a kick drum, lead synth, or vocal. This element serves as the foundation of your layer. Make sure it’s clean and well-processed before adding anything else.
Pro Tip:
Use EQ to carve out space for this primary sound. This ensures other layers won’t muddy the mix.
2. Complement, Don’t Compete
Each layer should serve a specific purpose. For example:
- Add a low-end layer for warmth and power.
- Introduce a mid-range layer for clarity and presence.
- Use a high-end layer for sparkle and detail.
Example:
When layering a snare drum, combine a tight, punchy sample with a brighter clap sound for extra snap.
Looking for high-quality samples? Check out our premium Munchies Jukebox sample packs to elevate your layering game!
3. Balance Frequencies with EQ
Overlapping frequencies can cause a muddy mix. Use EQ to sculpt each layer so they fit together seamlessly.
- Cut low frequencies from elements that don’t need them.
- Add subtle boosts to emphasize each layer’s unique characteristics.
4. Use Dynamics to Glue Layers Together
Compressing Layers
Apply light compression to individual layers to control dynamics and ensure consistency. For the entire stack, a bus compressor can unify the layers into a cohesive sound.
Layering with Volume
Each layer should have its volume adjusted to fit the mix. The loudest layer should usually be the most important sound.
5. Experiment with Textures and Panning
To create a more immersive mix:
- Use stereo panning to position layers across the stereo field.
- Introduce textures like pads or ambient sounds to fill out the background.
Example:
In a lead melody, pan one synth layer slightly to the left and another slightly to the right for a wide, expansive feel.
Avoid These Common Mistakes
1. Overlayering
Adding too many layers can clutter your mix. Stick to a few well-chosen sounds that complement each other.
2. Ignoring Phase Issues
Phase cancellation can occur when similar layers interfere with each other. Use a phase meter or flip the phase on one layer to check for issues.
Recommended Tools for Layering
- EQ Plugins: FabFilter Pro-Q, Waves REQ.
- Compression Tools: CLA-2A, SSL G-Master Bus Compressor.
- Synths for Unique Layers: Serum, Omnisphere.
- Sample Packs: Check out Munchies Jukebox sample packs for professionally curated sounds.
Final Thoughts
Mastering the art of layering sounds takes practice, but the payoff is worth it. By combining complementary elements, balancing frequencies, and experimenting with textures, you can create tracks that stand out from the crowd.
Start implementing these tips today and experience the difference layering makes in your music production. Don’t forget to explore the rich variety of sounds available in our Munchies Jukebox sample packs to find inspiration and elevate your mixes.
Did you find this guide helpful? Let us know your favorite layering tips in the comments below!

What Are Audio Plugins?
Audio plugins are small pieces of software used inside a type of software environment called digital audio workstations (DAWs); their role is to create, edit, or otherwise process audio. In other words, these plugins extend the functions of the DAW by offering virtual instruments, effects, and utilities. Whether your line of work is music production, track mixing, or sound design, plugins will become your inseparable tool.
Types of Audio Plugins
Audio plugins come in several forms, each with its function in the process of music creation. Some of them involve virtual instruments, such as synthesizers, samplers, and drum machines, for the creation of sounds, while others play the role of effects, including reverb, delay, compression, and equalization, among many more. The Utility Plugins will provide spectrum analyzers, tuners, and meters, and it will be useful for workflow and precision in audio editing.
Common Plugin Formats: AU vs VST3 vs VST2 vs AAX
Different plugin formats have different strengths and compatibilities. Here’s a list of the most common ones:
AU (Audio Units)
AU is Apple’s proprietary plugin format for macOS, primarily used in DAWs like Logic Pro and GarageBand. It’s tightly integrated with the Apple ecosystem, making it the default format for Mac-based producers.
VST2 (Virtual Studio Technology 2)
VST2 by Steinberg – probably the most popular format of audio plugins on both macOS and Windows. Although its development has been discontinued in favor of VST3, this is still supported in many DAWs.
VST3 (Virtual Studio Technology 3)
VST3 is an enhancement over VST2, providing greater CPU efficiency, dynamic I/O management, and advanced functionality such as surround sound. Thus, VST3 is the much-preferred choice among plugin developers because it is more efficient and flexible in performance.
AAX (Avid Audio eXtension)
AAX is the format unique to Pro Tools, from Avid. It’s optimized for high-end professional use in the audio industry, including working with Pro Tools systems.
Key Differences
- Compatibility: AU runs exclusively on macOS, while the others – VST and AAX – can run on both macOS and Windows.
- Performance: In terms of performance, VST3 and AAX are more CPU efficient and feature-rich compared to AUv2 and VST2.
- Platform Focus: Evidently, AAX is for Pro Tools, AU fits best in Apple’s ecosystem, and VST formats offer cross-platform flexibility.
[code_snippet id=33 format]
Stock vs Paid Plugins
Stock Audio Plugins
You get stock plugins right in your DAW, which tend to be more CPU-friendly. That makes them perfect for getting started or when the project needs you to spare CPU resources. They offer very solid foundational tools such as EQs, compressors, and reverb.
Pros:
- Free and already included in the DAW.
- Light, efficient, easy on resources.
- Simple, easy to use, and accomplish basic tasks.
Cons:
- Lack many features found in professional-grade plugins.
- Lack in some respects the quality and depth of certain paid-for plugins.
Paid Audio Plugins
Paid plugins tend to have better sound quality, more features, and flexibility, giving the producer and sound designer further control. Examples of Diva Synth, SERUM, and Pro-Q3 are industry-standard plugins giving producers and sound designers a high degree of creative possibility.
Pros:
- Better quality of sound and more developed features.
- Often regularly updated, bugs fixed, and supported by their authors.
- Specialized plugins for every production need.
Cons:
- Can be expensive, especially for premium plugins.
- May use more CPU power than stock plugins.
[code_snippet id=33 format]
Free Audio Plugins: The Best Free Tools for Music Production
Whether you are just starting out or simply looking to beef up your plugin library without cost, well, there are many excellent free plugins available. Here are some top recommendations:
1. Spitfire Audio LABS

Spitfire Audio LABS features an incredible range of absolutely stunning free virtual instruments, from orchestral ensembles down to ambient textures. Of these, the Soft Piano is one of the most sought after for its delicate and subtle sounds, which find applications in film scoring and ambient music.
2. SINE Player (Best Free Piano)
/
The SINE Player by Orchestral Tools encompasses some of the finest free orchestral libraries out there, including great pianos. This beautifully sampled piano is included in the Layers collection and offers very expressive, realistic sound, great for both classical and contemporary music.
3. Kilohearts Essentials

Kilohearts Essentials is a suite of over 30 free effects and utilities, including EQ, delay, compressor, reverb, and lots more. It’s CPU-friendly but versatile enough to get the job done for most production tasks; hence, it’s ideal for all producers, both amateur and professional.
Recommended Audio Plugins from Munchies Jukebox
Once you’re ready to pay for plugins, here are some recommendations from Munchies Jukebox:
1. Diva Synth

Diva by u-he is a high-class emulation of an analogue synthesizer that gained high praise from all types of producers due to its warm, vintage sound and versatility. It’s great, be it punchy basslines or atmospheric pads, which explains why it’s among one of the favourite devices within electronic music makers.
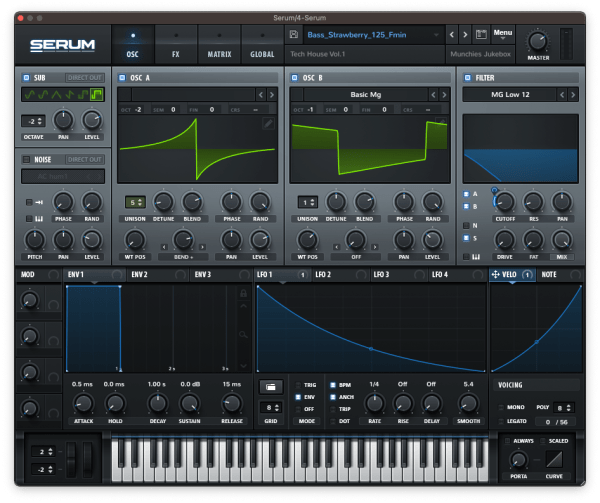
2. SERUM

Serum from Xfer Records is a wavetable synthesizer that is recognized as one of the finest sound designs, and at the same time, is very intuitive and easy to work with. Perfect for complicated and modern electronic sounds, producers of EDM, trap, and dubstep take full advantage of the synthesizer. Looking for best SERUM presets? Munchies Jukebox’s SERUM presets, unique refreshing sounds.
3. Pro-Q3

FabFilter Pro-Q3: High-end EQ plugin and greatly regarded, ‘great sounding controls’ with full transparency. It boasts features including dynamic EQ and is intuitively laid out, making this a go-to for both mixing and mastering engineers.
Plugin Boutique
Plugin Boutique is one of the leading online marketplaces for audio plugins. There’s an enormous array of virtual instruments, effects, and production tools hosted on it, while regular discounts, bundles, and exclusive offers make it perfect for both free and paid plugins.
Find more at Plugin Boutique deals here
[code_snippet id=33 format]

What is Beatport?

Beatport is an e-music store, firstly responding to the needs of DJs, producers, and just electronic music lovers. It enables one to buy, download, and stream high-quality digital music in various genres, including techno, house, trance, drum & bass, and many others. Through the years, it has turned into the point of concentration in finding the freshest cuts and exclusive releases within the electronic music world.
Understanding Beatport
Beatport is for professional DJs and producers, filled with high-resolution audio from the entire world that can be used either for live performance, studio production, or just enjoyment. Here’s how it works:
- Curated Collections: Genre-based charts, curated playlists, and exclusive releases on this website will guide you through your music discovery.
- Purchase & Download: Buy tracks in a range of formats, including MP3 and high-quality WAV, to add into a DJ set or a personal library.
- Streaming Services: Now, with Beatport LINK, full track streaming is possible right into your DJ software, such as Serato DJ or Pioneer Rekordbox.
Whether you are an experienced DJ or at the first steps of conquering your skill, Beatport equips you with various tools and features that will help find the perfect match for any set.
[code_snippet id=33 format]
Why is it Useful?
Besides its specialized focus on electronic dance music-EDM and kinds of services to a professional community of music, there is more. Here are some reasons why Beatport will be useful:
- Exclusive Content: Beatport often hosts exclusive tracks and releases from the biggest names in the business to the next big thing, with users often getting first access to the newest music.
- High-Quality Downloads: The site offers a possibility of downloading the audio files in high resolution, available in WAV or FLAC format for the best sound quality during a live performance or production.
- DJ Integration: Using the facility of Beatport LINK, DJs are able to stream tracks purchased or favorite ones directly into the DJ software from the cloud without using any USBs or having to download any large-sized libraries.
- Genre-Specific Charts: The charts at Beatport are genre-specific and updated regularly; it would provide one with the ease of being at par with the most fresh releases in the electronic music world.
A Little History of Beatport
It was first established as a small electronic music-centered website in 2004 out of Denver, Colorado. It quickly grew into one of the most well-known and publicized digital music stores for dance and club music. By offering exclusive releases, community-driven charts, and later integration with DJ software, Beatport positioned itself as a revolutionary platform for DJs and music producers alike.
Some key moments in the history of Beatport are the following:
- 2007: Launched its first-ever mobile app that allowed users to buy and download tracks on the go.
- 2010: The platform charts became the industry standard by which the success of electronic music releases was measured.
- 2019: The launch of Beatport LINK allowed DJs, for the very first time, to stream tracks straight from Beatport’s library into performance software such as Traktor, Serato, and Rekordbox.
Having been in the industry for over two decades, Beatport remains at the forefront of the electronic music scene, with a high-quality catalog of digital music that only continues to grow.
Start using Beatport now!
Whether you’re a DJ or an enthusiast into electronic music, Beatport is an essential tool. Take a look at the freshest exclusive releases here and start your collection today!
[code_snippet id=33 format]
Ableton Live 12.1 – A Deep Dive into New Features in Public Beta
The public beta for Ableton Live 12.1 is now available, with a host of new, powerful tools and enhancements that producers and performers will certainly appreciate. From the deeper features of advanced vocal processing to a completely redesigned drum sampler, plus key updates in the realm of audio effects, Ableton Live 12.1 shapes up as one of the most serious updates in some time.
Although the official release date is still unknown, this public beta gives a good impression of what’s to come, and one thing is for sure: it’s going to introduce more creative enhancements and smoothen the production workflows in several cool ways.
Key Features of Ableton Live 12.1
1. Auto Shift: Integrated Auto-Tune and Harmonization
Probably one of the biggest talking points in Live 12.1 is Auto Shift, Ableton’s native pitch correction tool. Not only does it offer professional-grade auto-tuning but also enables the easy creation of harmonies. Fully integrated into Ableton’s interface, this feature removes the need for third-party plugins and lets vocal tuning and harmony creation be smoother and faster. Ideal for both vocal correction and creative vocal processing, the user will find an intuitive tool to fine-tune his or her performances.
2. Enhanced Drum Sampler with Powerful Effects
The new drum sampler in Live 12.1 is much more than a simple sample player but rather a sound design powerhouse. Thanks to its big palette of integrated effects, it’s a deep manipulation station for your drum sounds. Included are the following onboard effects:
- Stretch: Time-stretch for changing the tempo of a drum hit without affecting the pitch
- Loop: Seamless looping for the creation of rhythmic textures or stutters.
- Pitch Envelope: Create evolving pitch changes over time to give dynamic movement.
- Punch: Enhance transients to let drums hit harder.
- 8-bit: Gritty, lo-fi textures reminiscent of classic digital sounds. • FM (Frequency Modulation): Modify your drum sound with complex, changing tones.
- Ring Mod: Insert metallic, somewhat bell-like textures into your samples.
- Sub Oscillator: Add a deep, sub-bass layer to reinforce the low end.
- Noise: Add noise for that added texture and punch.
With such features, this drum sampler opens creative doors for producers of all genres to easily layer and intricately craft sound. Whether one is creating hyper-detailed beats or experimenting with sound design, this sampler equips one with the tools to bring those ideas into reality.
3. Auto-Tagging for Samples
Sample management has never been easier. Ableton Live 12.1 introduces auto-tagging, automatically tagging and labeling your samples based on sonic characteristics. Perfect for producers working in large sound libraries, this allows you to find the exact sound you need in an instant and not disrupt the flow of your production process.
4. New Limiter with Three Modes: Standard, Soft Clip, and True Peak
The Limiter has undergone some serious enhancements in Live 12.1 and is now one serious powerhouse in getting professional-sounding mixes. Three different modes of limiting are available in the new Limiter:
- Standard: General-purpose limiting offering reliable and transparent control over the dynamics.
- Soft Clip: A mode for gentle clipping that maintains punch in your mix without distortion.
- True Peak: Ensures no peaks exceed threshold: hence ideal for broadcast or streaming standards.
In conjunction with these modes, the limiter supports compression of either Left/Right (L/R) or Mid/Side (M/S) for added flexibility in how dynamics in your stereo image are processed. If this wasn’t enough, the ability to unlink channels further allows the processor to process each channel independently of the other. In addition, there are three switchable lookahead times, which includes: 1.5 ms, 3 ms, and 6 ms gives a good degree of freedom over how the limiter responds to peaks in your audio.
5. Saturator with New Color Mode for Frequency-Specific Saturation
The new Color Mode added to the Saturator in Live 12.1 allowed producers to saturate frequencies within a specific range. This feature gave producers much more detail when adding harmonic warmth and grit to their tracks.
For example, Color Mode lets you emphasize the saturation of lower frequencies to give your bassline more punch, without distorting the higher ones. Or, you can focus the saturation on the higher ones so your synth leads and vocal cut through without muddying the low end. The Saturator handles low-end frequencies much better than before, thus allowing richness and clarity that do not overwhelm the mix.
Whether you’re using it for subtle coloration or aggressive distortion, the new Saturator in Ableton Live 12.1 is a must-have tool for mixing and sound design.
6. MIDI Editor Upgrades: Filter and Select MIDI Notes with Ease
Ableton has significantly upgraded the MIDI editor in Live 12.1, affording producers greater flexibility with their MIDI data. Filter and choose notes, with the new MIDI toolbar, based on user-defined attributes such as time, pitch, velocity, and duration. It’s now the most straightforward way to access detailed edits in complex MIDI arrangements, or make changes to multiple notes simultaneously. So whether it is melody editing, creating nuanced chord progressions, or adjusting drum patterns, this new feature is going to save time and boost workflow efficiency.
[code_snippet id=33 format]
Why Ableton Live 12.1 Is a Major Update
Ableton Live 12.1 introduces key features that significantly expand the creative possibilities and control in music production. This includes Auto Shift-a powerful in-the-box tool for vocal processing-and a new drum sampler that delivers a robust palette of effects toward deeper sound design. Further refinements to the limiter and saturator allow for fine-grained control over mixing and mastering, while MIDI editor enhancements speed up working with complex MIDI faster and more efficiently.
But this is not just a mere bug-fix update; it represents a significant leap, especially for producers who rely on stock devices to get the job done. Increased dynamic control via limiter, plus advanced MIDI tools, easily make Live 12.1 a compelling update both creatively and technically for the production of music.
When Will it be Released?
The official release date of Ableton Live 12.1 is still unknown, but the public beta is available. During this beta stage, users can enjoy the new features and bugs or suggestions can be reported to Ableton. Similar to most releases in beta format, it depends on the fixes and adjustments in this period for the time to release the final version.
Final Words: Ableton Live 12.1 Opens a New Dimension in Creativity
With the addition of new vocal production tools, an advanced drum sampler, and significant overhauls to mixing and MIDI editing, Ableton Live 12.1 promises to be a game-changing update that dramatically streamlines music production processes for all levels. Live 12.1 provides a myriad of powerful features that should appeal to those looking to fine-tune their vocals, dabble deep into sound design, and expand on their workflow.
And if you want to give your tracks that final professional touch, be sure to check out the Munchies Jukebox Ableton Mastering Racks—this is where your mixes get ready for release.
[code_snippet id=33 format]

What Are Serum Presets? Knowing Presets & How to Load Them
In music production, Serum presets play a vital role in shaping your sound. Whether you’re new or experienced, a solid library of presets saves time, sparks creativity, and enhances your tracks. But what exactly are presets, and why are they so important?
Why Are Presets So Important?
Loading presets within a synthesizer or plugin basically consists of loading pre-configured sound settings. You can load a preset to achieve a specific tone or texture, rather than creating it from scratch. Think of them as sound templates, a base to work from, with the ability to change everything to suit his or her needs. Presets have become especially popular in contemporary styles like EDM, hip-hop, and pop, where producers use specific sound characteristics to define a genre’s timbre.
Serum Presets: Why They Stand Out
In the wide world of synths, Serum has quickly become quite the popular figure in production. Its clear, powerful sound engine and intuitive user interface round out the go-to synthesizer for designing everything from sharp leads to lush pads. Serum presets are so flexible that they range over a wide span of sounds and almost fit into any genre.
When you use high-quality Serum presets, like those offered by Munchies Jukebox, you’re not just accessing a random collection of sounds. You’re diving into a curated set of tones that have been meticulously crafted to inspire your next track. The right preset can be the spark that turns a simple idea into a fully produced hit.
[code_snippet id=33 format]
How to Import Serum Presets
What Steps Should You Take Before Installing a Serum Preset Pack?
Before diving into the installation process of a Serum preset pack, there are a couple of crucial steps to ensure everything runs smoothly:
- Download the Preset Pack: First, ensure you’ve successfully downloaded the preset pack files from your source. Keep an eye on your browser’s downloads bar or the designated download folder on your computer.
- Extract the Files: If the files are compressed (commonly in .zip format), you need to extract them. Use a program like WinRAR, 7-Zip, or the built-in extraction tool on your computer’s operating system. Simply right-click the file and choose ‘Extract here’ or ‘Extract to [folder name]’.
By completing these steps, your files will be ready for easy installation, allowing you to focus on crafting your sound.
If you’ve just downloaded a bundle of presets and are dying to dive in, here is a really quick tutorial on how to import them to Serum:
- Load Serum within your DAW.
- Select the “Menu” from the top right.
- Pick “Show Serum Presets Folder” from the dropdown.
- Now that the presets folder has been opened, navigate to “Presets > User”.
- Now, drag and drop your downloaded preset folder into this directory.
- Close the folder. Your presets will now be accessible under the “User” section in Serum’s browser.
To find your downloaded Serum preset file, follow these simple steps:
- Check Your Downloads Folder: Most web browsers automatically save downloaded files to the Downloads folder on your computer. Start by opening your file explorer and navigating to this directory.
- Use the Search Function: If the preset isn’t immediately visible, use the search bar in your file explorer. Type in the name or part of the name of the file you downloaded. This can quickly help you locate it if it’s not in the expected folder.
- Sort by Date: Sorting files by the date modified or date added can also make finding recent downloads easier. Arrange the files to see the most recently downloaded ones first.
- Verify the Download Location: Sometimes, custom settings might direct downloads to a different location. Check your browser’s settings to confirm or change the path where files are saved.
By following these steps, you should be able to locate your Serum preset file efficiently.
Plus, Serum allows for easy loading of Presets. You’re able to drag and drop a preset right from the folder into the oscillator window, where the waveform appears. Serum does an automatic analysis of the preset, for all other tweaking and sound design.

Simply drag and drop your preset on Serum Wavetable More than time-saving tools, presets are creative tools that both expand your sonic palette and push your productions in new directions. With a synth as versatile as Serum, high-quality presets can really change your whole workflow. So, next time you seriously need to add some new flair and be inspired, don’t shy away from Munchies Jukebox offerings, which are set to inspire all manner of new creations.
[code_snippet id=33 format]

A Guide to Afro House: Why It’s Taking the Music Scene by Storm
Afro House has quickly become a popular genre, captivating global audiences with its vibrant rhythms and rich cultural roots. But what exactly is it, and what makes it stand out in today’s bustling music scene? In this guide, we’ll explore Afro House’s origins, key elements, and why it’s a favorite for DJs and producers.

What Is Afro House?
Afro House is a subgenre of house music that blends traditional African rhythms and instruments with modern electronic beats. Originating in South Africa, it combines deep house energy with soulful, percussive African elements. As a result, it’s both infectious and unique, making it a staple in clubs and festivals worldwide.
Key Elements of Afro House
What sets this genre apart is its distinctive combination of percussion-heavy beats, melodic instrumentation, and soulful vocals. Here are some of the main elements that define the genre:
- Percussion: Is driven by a variety of percussive elements, often featuring traditional African drums like the djembe, congas, and bongos. These drums create a hypnotic rhythm that’s impossible not to move to.
- Deep Bass lines: The bass lines tend to be deep and groovy, adding a layer of warmth and fullness to the track.
- Melodic Synths and Keys: it often incorporates melodic synths, pads, and keys that give the music an ethereal and emotional quality.
- Vocal Chants and Samples: Vocals can range from soulful singing to traditional African chants, providing a rich cultural texture to the music.
The Rhythmic Patterns of Afro House
One of the defining features of this genre is its complex, polyrhythmic structure. The genre typically follows a 4/4 house beat, but its unique swing and groove come from intricate percussion layering. The rhythms are often syncopated, creating a driving, yet organic feel that keeps the energy high.
Commonly Used Instruments
Alongside the traditional African drums, it often feature instruments like the marimba, kalimba, and even flutes. In addition to these instruments, they bring a natural, earthy tone to the music, which creates a warm contrast to the synthetic sounds typically found in electronic music. Producers also rely on modern DAWs and MIDI controllers to blend these organic elements with digital synths and samples.
[code_snippet id=33 format]
Where Did it Originate?
While house music originated in the United States, Afro House emerged in South Africa, especially in Johannesburg and Cape Town. Gaining momentum in the late 2000s, it was shaped by South Africa’s rich indigenous music and modern club culture. Today, it’s a global phenomenon, with artists like Black Coffee, Culoe De Song, Keinemusik, and MoBlack, consequently, bringing Afro House to the international stage.
Why is Trending Right Now
Afro House is more than just a genre; it’s a cultural movement. The sound is both familiar and fresh, seamlessly combining traditional rhythms with contemporary production techniques. Consequently, this blend makes Afro House incredibly versatile—perfect for everything from late-night club sessions to chilled-out listening at home. Given its appeal, it’s no surprise that this genre is making waves, dominating playlists, and influencing the sound of mainstream house music.
If you’re a producer looking to dive into the world of Afro House, having the right tools is essential. At Munchies Jukebox, we offer a selection of curated Afro House Sample Packs designed to help you capture the authentic vibe of this genre. Whether you need percussive loops, vocal chants, or melodic elements, we’ve got you covered.
Conclusion
Afro House is more than just a trend—it’s a genre with deep cultural roots, quickly becoming a mainstay in electronic music. Its infectious rhythms, rich instrumentation, and global appeal make it a must-have in any producer’s toolkit. Whether you’re a seasoned DJ or just starting out, Afro House offers endless possibilities for creative expression.
Ready to start creating? Check out our Afro House Samples at Munchies Jukebox and listen to our playlist on Spotify to take your productions to the next level!
[code_snippet id=33 format]

Understanding Music Distribution: Independent vs. Record Labels
In today’s digital age, music distribution plays a crucial role in an artist’s career. Whether you’re an independent artist aiming to make a name for yourself or a seasoned musician, understanding the nuances between independent distribution and working with record labels is essential. To begin with, let’s break down what music distribution is and explore the differences between independent music distribution and working with record labels.

What is Music Distribution?
Music distribution is the process of getting your music from the studio to your audience. It involves making your tracks available on platforms like Spotify, Apple Music, and YouTube Music. Traditionally, distribution was handled by record labels, but with the rise of digital platforms, independent distribution has become more accessible and popular.
[code_snippet id=33 format]
Independent Music Distribution vs. Record Labels
The choice between going independent or signing with a record label depends on various factors, such as your goals, resources, and where you are in your career. Both routes have their pros and cons.
Independent Music Distribution
With independent distribution, artists can release their music without relying on a traditional record label. For instance, platforms like DistroKid, TuneCore, and CD Baby make it straightforward for artists to upload their tracks and distribute them to streaming services and online stores.
Pros:
- Creative Control: As an independent artist, you retain full control over your music, artwork, and branding.
- Higher Revenue Share: Independent platforms usually allow you to keep a higher percentage of your earnings.
- Flexibility: You can release music whenever you want, without waiting for label approval.
Cons:
- No Upfront Funding: Independent artists must handle production, marketing, and promotion costs themselves.
- Limited Resources: Without a label, artists have fewer resources for promotion, which can limit exposure.
- DIY Marketing: Independent artists need to invest time in learning how to market themselves effectively.
Record Labels
Record labels, especially major ones, have traditionally been the gatekeepers of the music industry. Signing with a label can offer significant advantages, but it also comes with strings attached.
Pros:
- Financial Backing: Labels can provide the funds needed for recording, marketing, and touring.
- Industry Connections: Labels have established relationships with radio stations, media outlets, and booking agents.
- Professional Team: You get access to a team of experts who handle everything from PR to distribution.
Cons:
- Loss of Creative Control: Labels often dictate the type of music you release and how it’s marketed.
- Lower Revenue Share: Labels take a significant cut of your earnings in exchange for their services.
- Long-term Contracts: Signing with a label often involves long-term contracts, which can be restrictive.
[code_snippet id=33 format]
Popular Independent Music Distribution Platforms
For those considering the independent route, platforms like DistroKid have become a favorite among emerging artists. Specifically, DistroKid offers an easy-to-use interface, unlimited song uploads, and fast distribution to all major streaming platforms. Moreover, with features such as automatic royalty splits and a flat annual fee, it’s an excellent choice for artists looking to maintain control while reaching a global audience.
In addition, other popular options include TuneCore, which provides detailed analytics, and CD Baby, known for its comprehensive artist services.
Conclusion
Choosing between independent music distribution and a record label ultimately depends on your career goals. If you value creative freedom and are willing to put in the extra work, independent platforms like DistroKid might be the way to go. On the other hand, if you’re looking for more resources and are open to collaboration, signing with a record label could provide the support you need. Regardless of your choice, understanding the pros and cons will help you navigate the ever-evolving music industry and find the best path to success.
[code_snippet id=33 format]

How Copyright in Music Sampling Operates
In music production, sampling typically involves taking a portion of a sound recording and reusing it in a different song or composition. It’s a popular technique for creating new music, but raises copyright and intellectual property infringement concerns. So, learn how music samples copyright works in this full guide.

What is Music Sampling?
Sampling is basically the borrowing of a part of a pre-existing record and integrating it into a new piece of music. This may be as little as a few seconds of a catchy melody or can be an entire drum loop. Producers and musicians sample to create new sounds and elicit feelings of nostalgia from their listeners.
[code_snippet id=33 format]
The Legal Landscape of Copyright in Music Sampling
One of the most important fields in music sampling is an understanding of the copyright laws. It is designed to help the creator control whatever is done with his work and, in return, get paid for that. It applies to both composition, including melody, harmony, and lyrics, as well as sound recording, which means the actual performance of the song.
The mechanics of using other people’s music through sampling essentially works like this:
- Permission and Licensing: In order to legally use a script, one needs to obtain permission from the copyright holders of both the musical composition and the sound recording. This usually means discussing a licensing agreement and payment of some fee. One could be sued and held liable for damages for not having done that.
- Fair Use: Occasionally, usage of a sample may squeeze under the doctrine of fair use, but it’s a very gray and dangerous field. Fair use may be applicable for a transformative use of a sample, but in itself, it certainly is not a kosher safe haven.
- Clearing Samples: This is the process in which one uses a sample, then contacts the original artist, or owners of his work, to make sure they can use the sample, and not steal the original artist’s work.
Why You Need to Pay Attention
Serious legal consequences will be brought by a cleared sample. Music professionals often work with sample libraries and clearing services to ensure no legal consequences. For instance, companies such as Munchies Jukebox produce pre-cleared, curated sample packs that save producers from the related legal headaches.
[code_snippet id=33 format]
Best Practices for Sampling
- Always Clear Samples: Gain all the necessary permissions before using any sample in your music.
- Keep Detailed Records: Keep documentation of any agreements and communications regarding sampling.
- Consult with a Lawyer: If you aren’t sure on certain complex copyright issues, seek legal advice.
Conclusion
Sampling is a very useful tool in music production, among many others, but it does have associated legal responsibilities. Understanding Copyright in Music Sampling and clearing samples lets you confidently explore creativity while avoiding legal issues.
Want to learn more about pre-cleared samples, or how to move your production process even more quickly? If so, just read on with the greatest pleasure at Munchies Jukebox, which has an enormous library of ready-to-use samples.
The following best practices will guide you in keeping your sampling creative at all times and compliant. Happy producing!
[code_snippet id=33 format]

How Ableton Warp Mode Influences Samples: A Deep Dive
When working with samples in Ableton Live, one of the most crucial features to master is the Warp mode. Ableton’s automatic Warp mode settings are powerful but can cause issues. They often lead to problems with sample synchronization. In this post, we’ll explore why Automatic Warp can be problematic. We’ll also show you how to manually adjust samples for perfect timing. Additionally, we’ll cover the different Warp modes that Ableton offers.
The Problem with Automatic Warp Mode
By default, Ableton applies its Automatic Warp mode when you import audio samples. While this can be a time-saver, it often misinterprets the BPM of the sample, leading to undesirable results like off-tempo loops or out-of-sync samples. This is particularly common when working with complex audio files, such as drum loops or melodic phrases that contain subtle tempo fluctuations.
When Ableton guesses the wrong tempo, it stretches or compresses the sample in a way that can introduce unwanted artifacts, like glitches or phase issues. Many producers face problems here—your selected sample may not fit the groove, making everything feel off.
[code_snippet id=33 format]
How to Properly Align Your Samples
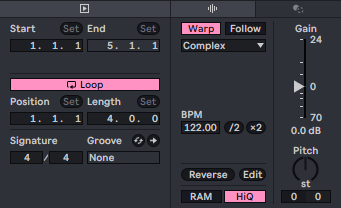
To avoid these issues, it’s often better to disable Warp initially and then manually adjust your sample’s tempo. Here’s a step-by-step guide:
- Import Your Sample: Drag your sample into an empty audio track in Ableton.
- Disable Automatic Warp: By default, the Warp feature will be on. Simply click the “Warp” button to turn it off.
- Adjust the Sample’s Tempo to Its Original BPM: Identify the original BPM of the sample, usually listed in the file name or metadata, and adjust the sample’s tempo to match that value. This ensures the sample fits perfectly within your project’s tempo.
- Re-enable Warp and Adjust Settings: Once the sample’s tempo aligns with your project, re-enable Warp and select the correct Warp mode for the type of audio you’re working with.
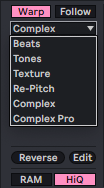
Understanding Ableton’s Warp Mode

Ableton offers several Warp modes, each designed for different types of audio. Choosing the right mode can make a significant difference in the sound quality and timing of your samples.
- Beats Mode: Ideal for drum loops and percussive elements. It focuses on maintaining the transients of the audio, ensuring that your drums stay punchy even after time-stretching.
- Tones Mode: Best for monophonic sounds like basslines or vocals. It works by maintaining the pitch while stretching or compressing the audio.
- Texture Mode: Suitable for complex, atmospheric sounds that have a lot of variation. It uses granular synthesis to preserve the texture of the audio.
- Repitch Mode: A simple mode that changes the pitch of the sample as you adjust the tempo, similar to speeding up or slowing down a vinyl record. This mode is great when you want a vintage, lo-fi feel.
- Complex and Complex Pro Modes: These are the go-to options for full songs or polyphonic material. They provide the most natural time-stretching, making them perfect for maintaining the integrity of your samples across a wide range of BPMs.
Conclusion
The Warp feature in Ableton is powerful but requires a bit of knowledge to use effectively. By understanding why Automatic Warp can throw your samples out of sync and knowing how to manually align them, you’ll avoid many common pitfalls. Additionally, selecting the appropriate Warp mode based on the content of your sample is essential for maintaining both timing and audio quality.
If you’re looking for high-quality samples that fit seamlessly into your Ableton projects, check out our collection at Munchies Jukebox. Our professionally designed packs are optimized for all genres, ensuring you spend less time worrying about sync issues and more time creating.
Keep your samples tight, your workflow smooth, and your beats grooving by taking control of Ableton’s Warp settings.
[code_snippet id=33 format]