
Your cart is currently empty!
Tag: ableton
How Ableton Warp Mode Influences Samples: A Deep Dive
When working with samples in Ableton Live, one of the most crucial features to master is the Warp mode. Ableton’s automatic Warp mode settings are powerful but can cause issues. They often lead to problems with sample synchronization. In this post, we’ll explore why Automatic Warp can be problematic. We’ll also show you how to manually adjust samples for perfect timing. Additionally, we’ll cover the different Warp modes that Ableton offers.

The Problem with Automatic Warp Mode
By default, Ableton applies its Automatic Warp mode when you import audio samples. While this can be a time-saver, it often misinterprets the BPM of the sample, leading to undesirable results like off-tempo loops or out-of-sync samples. This is particularly common when working with complex audio files, such as drum loops or melodic phrases that contain subtle tempo fluctuations.
When Ableton guesses the wrong tempo, it stretches or compresses the sample in a way that can introduce unwanted artifacts, like glitches or phase issues. Many producers face problems here—your selected sample may not fit the groove, making everything feel off.
How to Properly Align Your Samples
To avoid these issues, it’s often better to disable Warp initially and then manually adjust your sample’s tempo. Here’s a step-by-step guide:
- Import Your Sample: Drag your sample into an empty audio track in Ableton.
- Disable Automatic Warp: By default, the Warp feature will be on. Simply click the “Warp” button to turn it off.
- Adjust the Sample’s Tempo to Its Original BPM: Identify the original BPM of the sample, usually listed in the file name or metadata, and adjust the sample’s tempo to match that value. This ensures the sample fits perfectly within your project’s tempo.
- Re-enable Warp and Adjust Settings: Once the sample’s tempo aligns with your project, re-enable Warp and select the correct Warp mode for the type of audio you’re working with.
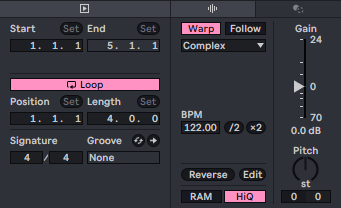
Understanding Ableton’s Warp Mode

Ableton offers several Warp modes, each designed for different types of audio. Choosing the right mode can make a significant difference in the sound quality and timing of your samples.
- Beats Mode: Ideal for drum loops and percussive elements. It focuses on maintaining the transients of the audio, ensuring that your drums stay punchy even after time-stretching.
- Tones Mode: Best for monophonic sounds like basslines or vocals. It works by maintaining the pitch while stretching or compressing the audio.
- Texture Mode: Suitable for complex, atmospheric sounds that have a lot of variation. It uses granular synthesis to preserve the texture of the audio.
- Repitch Mode: A simple mode that changes the pitch of the sample as you adjust the tempo, similar to speeding up or slowing down a vinyl record. This mode is great when you want a vintage, lo-fi feel.
- Complex and Complex Pro Modes: These are the go-to options for full songs or polyphonic material. They provide the most natural time-stretching, making them perfect for maintaining the integrity of your samples across a wide range of BPMs.
Conclusion
The Warp feature in Ableton is powerful but requires a bit of knowledge to use effectively. By understanding why Automatic Warp can throw your samples out of sync and knowing how to manually align them, you’ll avoid many common pitfalls. Additionally, selecting the appropriate Warp mode based on the content of your sample is essential for maintaining both timing and audio quality.
If you’re looking for high-quality samples that fit seamlessly into your Ableton projects, check out our collection at Munchies Jukebox. Our professionally designed packs are optimized for all genres, ensuring you spend less time worrying about sync issues and more time creating.
Keep your samples tight, your workflow smooth, and your beats grooving by taking control of Ableton’s Warp settings.

Mastering in Ableton: A Comprehensive Guide
As a producer, you’ve likely heard that mastering is crucial for achieving a polished, professional sound. But what exactly is mastering, and how can you effectively master in Ableton? Here, we will consider the basics of mastering, why it is extremely essential to your music, and how to get professional-sounding results in your Digital Audio Workstation (DAW).
What is Mastering?
Mastering is a process whereby the mixed track is balanced and enhanced in the final stage of music production. Mastering adjusts the loudness and tone balance of your track to ensure it sounds great on all playback systems. It’s what takes your mix from sounding “good” to sounding radio-ready.
Why Mastering is Important?
Mastering isn’t simply a means of making your track loud, it’s about making the track consistent and competitive with other professional releases. The reason why mastering is essential is because of the following:
- Dynamic Balance: Make sure that your track has the right dynamic range and will not be flat or punchy.
Frequency Correction: Balance frequencies to ensure your bass, mids, and highs are perfectly tuned. - Stereo Imaging: This enhances the width and depth of your track, so that the listener has an enveloping experience.
- Preparation for Distribution: This makes sure your track is formatted correctly for streaming platforms, vinyl pressing, or for making CDs.
Put shortly, it’s this final process that polishes your music into a cohesive, professional sound on any device.
Can You Master a Track in Any DAW?
Yes, you can master in almost any DAW. Ableton seems to be a favorite among many due to its flexibility and friendly interface. Though Ableton excels in live performance and electronic music production, it is also a competent tool for mastering. The quality of your mastering in Ableton depends on your understanding of the process and available tools.
Why Racks in Ableton Are Useful for Mastering
Mastering in Ableton: Understanding Ableton Racks
One of the nicer features in Ableton has to be its Audio Effect Racks, but what makes it most useful is the chaining and customization of multiple process effects. These racks can keep your master streamlined, combining EQ, compression, saturation, and stereo imaging in one window.
Munchies Jukebox – Electronic Mastering Rack Looking for professional-grade mastering racks to take your sound to the next level? Well, check out the Munchies Jukebox Ableton Racks. These racks are expertly designed to achieve high-quality results easily, without complex settings.
Should You Hire a Professional Mastering Engineer?
While this can result in good results most of the time, when you’re preparing a release for commercial distribution, a professional mastering engineer really could make all the difference. A mastering engineer offers trained ears, years of experience, and specialized equipment to ensure your track is polished to perfection.
If you’re serious about giving your music the best possible finish, then investigate Munchies Jukebox’s mastering services. With professional engineers handling your track, you can be assured it gets the final touch needed to stand out.
Conclusion
Mastering in music production is crucial, but with the right tools and techniques, you can achieve excellent results within Ableton. However, working with a professional really can take your track to the next dimension most of the time. Whether you want to master your track yourself with Ableton’s powerful tools at your disposal or seek help, the bottom line is that it is a way to make your music sound its best.
Happy producing!

