Your cart is currently empty!
Tag: samples
How to Add Samples to FL Studio & Ableton
Samples are the building blocks of modern music production, but getting them into your DAW can feel daunting for newcomers. Whether you’re using FL Studio or Ableton Live, this guide breaks down the process with simple, actionable steps. Let’s turn those loops, one-shots, and vocals into polished tracks!
Adding Samples to FL Studio
- Drag & Drop:
- Open FL Studio’s Playlist or Channel Rack.
- Drag samples directly from your folder (or platforms like Munchies Jukebox) into the workspace.
- Using the Browser:
- Open FL Studio’s Browser (Ctrl+Alt+B).
- Navigate to your sample folder, then drag files into the Channel Rack for quick assignment.
- Slicex & Fruity Slicer:
- Load a sample into Slicex (for beat slicing) or Fruity Slicer (for chopping loops).
- Use Detect Tempo to sync with your project BPM.
Pro Tip: Right-click the waveform and select “Fit to tempo” for automatic timing adjustments.
Adding Samples to Ableton Live
- Drag & Drop:
- Drag samples from your library (or platforms like Splice) into the Arrangement View or Session View.
- Simpler/Sampler:
- Drag a sample into Simpler (basic sampling) or Sampler (advanced editing).
- Adjust Start/End Points, pitch, and loop settings for precise control.
- Drum Rack:
- Load a Drum Rack and drag one-shots (kicks, snares) into individual pads.
- Use Velocity Sensitivity to add dynamic variation.
Pro Tip: Enable Warp Mode to match samples to your project tempo automatically.
Pro Workflow Hacks
- Organize Your Library:
- Tag samples by genre, key, or mood in FL Studio’s Browser or Ableton’s Collections.
- Layer for Depth:
- Stack a Munchies Jukebox synth loop with live recordings for texture.
- MIDI Conversion:
- In Ableton, right-click audio and select Convert Melody/Harmony to MIDI for instant melodies.
Common Mistakes to Avoid
- Ignoring Tempo Sync: Always match sample BPM to your project.
- Overcrowding: Less is more—avoid cluttering your track with too many samples.
- Forgetting Licensing: Ensure samples are royalty-free (e.g., packs from Munchies Jukebox).
Conclusion: Master Your DAW, Elevate Your Sound
Adding samples to FL Studio or Ableton is just the first step. By organizing your library, leveraging warping/slicing tools, and prioritizing quality sounds, you’ll transform raw samples into professional tracks.
Ready to Experiment? Explore curated packs from Munchies Jukebox and start crafting today!
- Drag & Drop:
What Are the Best Sample Packs? A 2025 Guide for Producers
In 2025, sample packs remain essential tools for producers, offering everything from punchy drum kits to ethereal soundscapes. But with endless options flooding the market, how do you find the best sample packs for your sound? This guide highlights genre-defining packs, hidden gems, and trusted platforms to help you craft tracks that cut through the noise.
Best Sample Packs by Genre
- Hip-Hop & Trap
- Lex Luger Drum Kit (BVKER): Iconic 808s, snares, and hi-hats for trap’s gritty backbone.
- Nonstop Creator (LANDR): Dark, atmospheric loops inspired by Drake’s producer Noah “40” Shebib.
- Dope Drums Vol. 1 (Cymatics.fm): Crisp, modern percussion for chart-ready beats.
- EDM & House
- Future Big Room Techno Rave (Loopcloud): High-energy synth loops, MIDI files, and drops.
- Tech House Melodics (LANDR): Trippy vocal chops and chunky basslines for club-ready grooves.
- Lo-Fi & Chill
- Dusty Lo-Fi (LANDR): Crackling vinyl textures, jazzy chords, and laid-back grooves.
- Vaporwave Drum Kit (BVKER): Nostalgic kicks and snares for retro, dreamy vibes.
- Cinematic & Ambient
- The Eerie Expanse (ShamanStems): Haunting pads and dystopian soundscapes for film scores.
- Oneheart Ambient (Splice): Ethereal textures and haunting vocal samples.
Free vs. Premium Picks
- Free Essentials:
- Free Starter Collection (LANDR): Drums, melodies, and vocals for quick experimentation.
- Loopmasters’ Genre Packs: Hip-hop, techno, and cinematic samples to spark creativity.
- Premium Powerhouses:
- Python MIDI Pack (Cymatics): Grammy-winning chord progressions for Hip-Hop and R&B.
- Ultimate MIDI Collection (Ghosthack): Versatile melodies and basslines for diverse genres.
Specialized Tools
- MIDI Magic:
- Lo-Fi & Soul Chords (Red Sounds): Jazz-inspired progressions for nuanced tracks.
- Free MIDI Chord Tool Kit (Transmission Samples): Hundreds of chords sorted by key.
- Sound Effects:
- BBC Sound Effects: Global SFX for immersive storytelling.
- Polymer (LANDR): Everyday noises transformed into ambient layers.
Why Quality & Originality Matter
The best packs strike a balance between fresh sounds and legal safety. For instance, Splice’s Sounds of KSHMR series offers polished, royalty-free loops trusted by chart-topping producers. Similarly, platforms like Munchies Jukebox focus on curated, genre-defying sounds that inspire without boxing you into trends.
How to Choose Your Perfect Pack
- Genre Alignment: Match packs to your style (e.g., Tech House Melodics for club tracks).
- Licensing Clarity: Prioritize royalty-free terms for commercial releases.
- Mix & Match: Blend free starter packs with premium tools as your skills grow.
Conclusion: Craft Your Signature Sound
The “best” sample pack depends on your creative vision. Whether you’re building trap bangers with Lex Luger kits or crafting ambient worlds with The Eerie Expanse, focus on packs that elevate originality. For producers seeking subtlety and versatility, explore curated libraries from trusted platforms like Munchies Jukebox to refine your sound.
Ready to Experiment? Dive into these picks and let your creativity run wild.
- Hip-Hop & Trap
What Are Sample Packs? Producer’s Secret Weapon
In today’s music industry, sample packs are the unsung heroes behind countless hits. But what exactly are they, and how do they work? Whether you’re a new producer or a seasoned pro, this guide demystifies sample packs, their components, and how to wield them like a pro. Let’s dive in!
What Are Sample Packs?
Sample packs are curated libraries of pre-recorded audio files designed to enhance your music production. These packs typically include:
- Loops: Pre-mixed drum grooves, melodic phrases, or vocal hooks that repeat seamlessly.
- One-Shots: Individual sounds like kicks, snares, synths, or FX hits.
- Multisamples: Captured notes from real instruments (e.g., pianos, guitars) for realistic playback.
- Construction Kits: Stems and layered elements for building full tracks.
Types of Sample Packs
- Royalty-Free: Pay once, use forever (e.g., packs from Munchies Jukebox).
- Genre-Specific: Tailored for hip-hop, EDM, lo-fi, or cinematic scoring.
- Free vs. Premium: Free packs offer basic sounds, while premium packs deliver studio-grade quality.
- Artist-Curated: Designed by top producers (e.g., Deadmau5 or Oliver).
Why Use Sample Packs?
- Speed Up Workflow: Skip sound design and jump straight to creativity.
- Professional Polish: Access high-quality sounds crafted by industry experts.
- Cost Efficiency: Avoid expensive studio sessions or instrument purchases.
- Creative Inspiration: Break through writer’s block with fresh textures.
How to Use Sample Packs Effectively
- Layer Sounds: Combine a Loopmasters drum loop with original recordings for depth.
- Customize Everything: Tweak BPM, add effects, or chop samples to make them unique.
- Stay Legal: Always verify licensing terms—platforms like Munchies Jukebox simplify this with clear agreements.
Conclusion: Unlock Your Creative Potential
Sample packs are more than shortcuts—they’re creative catalysts. By blending them with originality, you can craft tracks that stand out. Ready to explore? Dive into trusted platforms like Munchies Jukebox and elevate your sound today.

Layering Sounds for a Full Mix
Master the art of layering rich, multidimensional tracks that captivate your listeners.
When it comes to producing music that stands out, layering sounds is a critical skill. It’s the secret behind those lush, immersive mixes that feel alive and dynamic. Whether you’re a beginner or a seasoned producer, understanding how to layer effectively can elevate your tracks from ordinary to extraordinary.
In this guide, we’ll explore essential techniques and tips for layering sounds to achieve a full, balanced mix. Let’s dive in!
Layering clap and percussion sounds to create a fuller and more dynamic mix. What is Sound Layering in Music Production?
Sound layering involves combining multiple audio elements to create a more complex and cohesive sound. Instead of relying on a single sound source, you blend layers to add depth, width, and texture to your track.
Why is Layering Important?
Layering helps to:
- Add richness to your track by filling out the frequency spectrum.
- Enhance dynamics, making your music feel more alive.
- Create unique textures that distinguish your sound.
Step-by-Step Guide to Effective Sound Layering
1. Start with a Strong Foundation
Begin with your core sound, whether it’s a kick drum, lead synth, or vocal. This element serves as the foundation of your layer. Make sure it’s clean and well-processed before adding anything else.
Pro Tip:
Use EQ to carve out space for this primary sound. This ensures other layers won’t muddy the mix.
2. Complement, Don’t Compete
Each layer should serve a specific purpose. For example:
- Add a low-end layer for warmth and power.
- Introduce a mid-range layer for clarity and presence.
- Use a high-end layer for sparkle and detail.
Example:
When layering a snare drum, combine a tight, punchy sample with a brighter clap sound for extra snap.
Looking for high-quality samples? Check out our premium Munchies Jukebox sample packs to elevate your layering game!
3. Balance Frequencies with EQ
Overlapping frequencies can cause a muddy mix. Use EQ to sculpt each layer so they fit together seamlessly.
- Cut low frequencies from elements that don’t need them.
- Add subtle boosts to emphasize each layer’s unique characteristics.
4. Use Dynamics to Glue Layers Together
Compressing Layers
Apply light compression to individual layers to control dynamics and ensure consistency. For the entire stack, a bus compressor can unify the layers into a cohesive sound.
Layering with Volume
Each layer should have its volume adjusted to fit the mix. The loudest layer should usually be the most important sound.
5. Experiment with Textures and Panning
To create a more immersive mix:
- Use stereo panning to position layers across the stereo field.
- Introduce textures like pads or ambient sounds to fill out the background.
Example:
In a lead melody, pan one synth layer slightly to the left and another slightly to the right for a wide, expansive feel.
Avoid These Common Mistakes
1. Overlayering
Adding too many layers can clutter your mix. Stick to a few well-chosen sounds that complement each other.
2. Ignoring Phase Issues
Phase cancellation can occur when similar layers interfere with each other. Use a phase meter or flip the phase on one layer to check for issues.
Recommended Tools for Layering
- EQ Plugins: FabFilter Pro-Q, Waves REQ.
- Compression Tools: CLA-2A, SSL G-Master Bus Compressor.
- Synths for Unique Layers: Serum, Omnisphere.
- Sample Packs: Check out Munchies Jukebox sample packs for professionally curated sounds.
Final Thoughts
Mastering the art of layering sounds takes practice, but the payoff is worth it. By combining complementary elements, balancing frequencies, and experimenting with textures, you can create tracks that stand out from the crowd.
Start implementing these tips today and experience the difference layering makes in your music production. Don’t forget to explore the rich variety of sounds available in our Munchies Jukebox sample packs to find inspiration and elevate your mixes.
Did you find this guide helpful? Let us know your favorite layering tips in the comments below!

How Copyright in Music Sampling Operates
In music production, sampling typically involves taking a portion of a sound recording and reusing it in a different song or composition. It’s a popular technique for creating new music, but raises copyright and intellectual property infringement concerns. So, learn how music samples copyright works in this full guide.

What is Music Sampling?
Sampling is basically the borrowing of a part of a pre-existing record and integrating it into a new piece of music. This may be as little as a few seconds of a catchy melody or can be an entire drum loop. Producers and musicians sample to create new sounds and elicit feelings of nostalgia from their listeners.
[code_snippet id=33 format]
The Legal Landscape of Copyright in Music Sampling
One of the most important fields in music sampling is an understanding of the copyright laws. It is designed to help the creator control whatever is done with his work and, in return, get paid for that. It applies to both composition, including melody, harmony, and lyrics, as well as sound recording, which means the actual performance of the song.
The mechanics of using other people’s music through sampling essentially works like this:
- Permission and Licensing: In order to legally use a script, one needs to obtain permission from the copyright holders of both the musical composition and the sound recording. This usually means discussing a licensing agreement and payment of some fee. One could be sued and held liable for damages for not having done that.
- Fair Use: Occasionally, usage of a sample may squeeze under the doctrine of fair use, but it’s a very gray and dangerous field. Fair use may be applicable for a transformative use of a sample, but in itself, it certainly is not a kosher safe haven.
- Clearing Samples: This is the process in which one uses a sample, then contacts the original artist, or owners of his work, to make sure they can use the sample, and not steal the original artist’s work.
Why You Need to Pay Attention
Serious legal consequences will be brought by a cleared sample. Music professionals often work with sample libraries and clearing services to ensure no legal consequences. For instance, companies such as Munchies Jukebox produce pre-cleared, curated sample packs that save producers from the related legal headaches.
[code_snippet id=33 format]
Best Practices for Sampling
- Always Clear Samples: Gain all the necessary permissions before using any sample in your music.
- Keep Detailed Records: Keep documentation of any agreements and communications regarding sampling.
- Consult with a Lawyer: If you aren’t sure on certain complex copyright issues, seek legal advice.
Conclusion
Sampling is a very useful tool in music production, among many others, but it does have associated legal responsibilities. Understanding Copyright in Music Sampling and clearing samples lets you confidently explore creativity while avoiding legal issues.
Want to learn more about pre-cleared samples, or how to move your production process even more quickly? If so, just read on with the greatest pleasure at Munchies Jukebox, which has an enormous library of ready-to-use samples.
The following best practices will guide you in keeping your sampling creative at all times and compliant. Happy producing!
[code_snippet id=33 format]

How Ableton Warp Mode Influences Samples: A Deep Dive
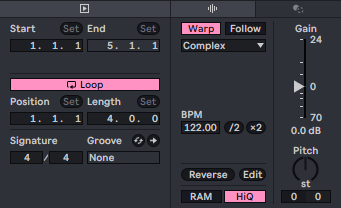
When working with samples in Ableton Live, one of the most crucial features to master is the Warp mode. Ableton’s automatic Warp mode settings are powerful but can cause issues. They often lead to problems with sample synchronization. In this post, we’ll explore why Automatic Warp can be problematic. We’ll also show you how to manually adjust samples for perfect timing. Additionally, we’ll cover the different Warp modes that Ableton offers.
The Problem with Automatic Warp Mode
By default, Ableton applies its Automatic Warp mode when you import audio samples. While this can be a time-saver, it often misinterprets the BPM of the sample, leading to undesirable results like off-tempo loops or out-of-sync samples. This is particularly common when working with complex audio files, such as drum loops or melodic phrases that contain subtle tempo fluctuations.
When Ableton guesses the wrong tempo, it stretches or compresses the sample in a way that can introduce unwanted artifacts, like glitches or phase issues. Many producers face problems here—your selected sample may not fit the groove, making everything feel off.
[code_snippet id=33 format]
How to Properly Align Your Samples
To avoid these issues, it’s often better to disable Warp initially and then manually adjust your sample’s tempo. Here’s a step-by-step guide:
- Import Your Sample: Drag your sample into an empty audio track in Ableton.
- Disable Automatic Warp: By default, the Warp feature will be on. Simply click the “Warp” button to turn it off.
- Adjust the Sample’s Tempo to Its Original BPM: Identify the original BPM of the sample, usually listed in the file name or metadata, and adjust the sample’s tempo to match that value. This ensures the sample fits perfectly within your project’s tempo.
- Re-enable Warp and Adjust Settings: Once the sample’s tempo aligns with your project, re-enable Warp and select the correct Warp mode for the type of audio you’re working with.
Understanding Ableton’s Warp Mode

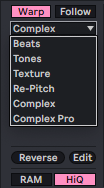
Ableton offers several Warp modes, each designed for different types of audio. Choosing the right mode can make a significant difference in the sound quality and timing of your samples.
- Beats Mode: Ideal for drum loops and percussive elements. It focuses on maintaining the transients of the audio, ensuring that your drums stay punchy even after time-stretching.
- Tones Mode: Best for monophonic sounds like basslines or vocals. It works by maintaining the pitch while stretching or compressing the audio.
- Texture Mode: Suitable for complex, atmospheric sounds that have a lot of variation. It uses granular synthesis to preserve the texture of the audio.
- Repitch Mode: A simple mode that changes the pitch of the sample as you adjust the tempo, similar to speeding up or slowing down a vinyl record. This mode is great when you want a vintage, lo-fi feel.
- Complex and Complex Pro Modes: These are the go-to options for full songs or polyphonic material. They provide the most natural time-stretching, making them perfect for maintaining the integrity of your samples across a wide range of BPMs.
Conclusion
The Warp feature in Ableton is powerful but requires a bit of knowledge to use effectively. By understanding why Automatic Warp can throw your samples out of sync and knowing how to manually align them, you’ll avoid many common pitfalls. Additionally, selecting the appropriate Warp mode based on the content of your sample is essential for maintaining both timing and audio quality.
If you’re looking for high-quality samples that fit seamlessly into your Ableton projects, check out our collection at Munchies Jukebox. Our professionally designed packs are optimized for all genres, ensuring you spend less time worrying about sync issues and more time creating.
Keep your samples tight, your workflow smooth, and your beats grooving by taking control of Ableton’s Warp settings.
[code_snippet id=33 format]

How to Use Music Samples: A Guide for Producers
Music samples are an essential tool for amateur and professional producers, as well as anyone in the music industry. It could be the base of your track, a key element in your mix, or spark new ideas. This guide will help you start using music samples effectively and improve your mix techniques. 
What are Music Samples?
A music sample is a short sound snippet—like a drum loop, vocal phrase, or melody—taken from existing recordings or created independently. Samples are used in various styles—like hip-hop, electronic, and pop—to build tracks, add layers, or shape sound textures. They can be short snippets or long loops, tailored to fit specific production needs.
Music Samples
- Drum Samples: These include but are not limited to kick drums, snares, hi-hats, and the overall drum loops.
- Melodic Samples: Such as synth riffs, basslines, guitar loops, piano chords, and so on.
- Vocal Samples: Including spoken phrases, adlibs, chopped vocals, acapella snippets, and so forth.
- Ambient and FX Samples: They can speed up production, boost creativity, and help create complex sounds that would be difficult to design from scratch.
Below are some reasons why samples are so beneficial:
- Efficiency: Samples make hours of work easier by coming as already made sounds.
- Inspiration: Sampling often opens up new creative avenues that one might not have contemplated.
- Professional Quality: High-quality samples will then render your tracks this polished feel, giving your tracks an industry standard sound.
- Diversity of Sounds: Using samples in your music combines diverse sounds from different eras, genres, and styles.
[code_snippet id=33 format]
How to Use Music Samples Productively
1. Knowledge about the Copyright Law
This is one of the most important considerations when using music samples. All the samples available are not copyright-free. Ones found in reputed songs or those available in the mere commercial libraries are generally not free to be used by anyone. Here’s the general kind of licensing that prevails:
- Royalty-Free: Once purchased or downloaded, these samples come with no ongoing obligations, allowing you to use them freely in your productions without any additional fees. Explore and acquire high-quality samples like these at Munchies Jukebox.
- Creative Commons: Such samples can be used for free under certain conditions, for example, if you provide a backlink to the creator.
- Cleared Samples: Sometimes, for well-known or commercial compositions, you need to obtain a sample clearance, an official permission from the copyright holder to use their material.
2. Chop, Slice, and Rearrange
You can also manipulate the sound creatively instead of just using it as is, in the form of a loop. Try chopping, reversing, or re-pitching it. For example, chopping and rearranging a small part of a melodic loop can create a completely new groove or melody.
3. Layer Your Samples
Combining different samples will make your track richer. You might want to layer multiple drum samples for fullness, or stack a number of vocal samples for harmonies or different effects. Layering samples with your own productions might be a great way to merge your creativity with pre-made sounds.
4. Adjust and Process the Samples
The magic in sampling would oftentimes be how you manipulate the original sound. Transform the samples by adding different effects, like reverb, delay, distortion, or equalization. Stretching, compressing time, changing pitch, and filtering your samples will also give it its own character, more apt for the vision you have.
5. Incorporate Music Samples Subtly
While some genres thrive on obvious sampling, subtlety can be equally powerful. A sample might be tucked into the background, adding texture and atmosphere without drawing attention. This works especially well with ambient effects, vocal chops, or transitional sounds.
Sample Use Best Practices
- Be selective: Do not overload a track with too many samples. Think carefully about this.
- Make It Your Own: You’re using pre-made sounds, but still, be sure to make it sound different from the original, using whatever effects, arrangement, or blending it in with your own material.
- Respect the Source Material: Properly credit or clear the sample material you use, especially if you’re sourcing it from old or obscure tracks or artists.
Conclusion
Sampling is an art whereby a producer can reach into the vast swamps of sound and texture. It really doesn’t matter whether you are chopping up old vinyl records, using a royalty-free sample pack, or recording your sounds; the success of this process lies in how you use and integrate elements into your unique style. Your music can really be brought to another level by applying samples to it and really taking your productions to the next level by finding that happy balance of creativity with respect to the source material and being mindful of legal requirements.
[code_snippet id=33 format]

How to Tune Samples

How to Easily Tune Samples in Major and Minor Scales
One very important part of music production is tuning the samples. Whether it’s drum hits, vocal chops, or loops, keeping all elements in key is crucial for a polished sound. In this article, we’ll cover sample tuning in major and minor scales and explain relative scales so you can easily tune your project.
Understanding Major and Minor Scales
Firstly, let’s understand what major and minor scales are.
For instance, major scales are often bright, happy, while minor scales are somewhat more melancholy or emotional. The pattern for a major scale is W-W-H-W-W-W-H. The pattern for a minor scale is W-H-W-W-H-W.
Let’s consider the examples of C Major and A Minor. Now the notes in the C Major would be C-D-E-F-G-A-B and A Minor would be A-B-C-D-E-F-G. Do you notice something? Well, they both have the same notes. This leads us to the relative scales.
[code_snippet id=33 format]
What Are Relative Scales?
Two kinds of scales, relative scales, make use of the same notes, only starting on a different root note. For example, in the case of C Major and A Minor, understanding this relationship holds the very important key because it will help you tune your samples easily, moving from major to minor keys.
For a sample in A Minor, you can easily shift to a major key using its relative scale, C Major.
Practical Tip: Moving Between Major and Minor
Here’s one real-world tip for repitching samples between major and minor keys: If you work on a project in a minor key, and you have a sample in a major scale, you’ll want to tune the sample up by 3 semitones. For instance, let’s say our project is in A Minor, and you’ve found a sample in E Major. We count 3 semitones up from A Minor, and it takes us to C Major. So now you have your relative scale, which is C Major, and your sample is currently in E Major, so you only have to pitch down your sample by 4 semitones to get it into your project. The same procedure applies in reverse: if you’re in a major key and find a minor sample, pitch it accordingly.
How to Tune Your Samples
With this in mind, it becomes a lot easier to tune samples. Here’s how to do it in a fairly simple way:
1. Identify the Original Key: Before you can tune a sample, you need to know the key in which it already is. If you’re not really certain, key detection plug-ins are there to help you with the guesswork.
- Selecting the Target Key: Choose whether you want your sample in major or minor, and choosing whether it must shift to a relative scale.
- Pitch Shift Accordingly: Use the pitch shift tool in your DAW to move the sample up or down in semitones until it aligns with the target key. For example, moving a sample from A minor to C major requires no shifting, as they are relative scales.
- Look Out for Artifacts: After any tuning, you should check the quality of your sample. Often, pitch shifting introduces artifacts that you want to get rid of with something like an EQ or transient shaping.
With this information about the relative relationships in their names, major and minor scale harmony, you’ll know how to tune any sample easily and keep your music perfectly in harmony.
Anybody searching for top-class samples ready to be tuned and dropped into your tracks, this vast selection from Munchies Jukebox offers great ground to get started. It features well-crafted samples that are easy to integrate; you will definitely be right on course to increase your production game in no time.
Final Thoughts
Tuning your samples seems like something very scary first off, but really, with just a basic grasp of the scales and some practice, pretty soon it becomes like second nature. Remember, trust your ears and try out different keys to get the full effect—it might take a little time. Happy producing!
[code_snippet id=33 format]

What are Samples: One Shots, Loops, and More
In music production, the term “sample” is common, but its meaning can vary depending on how it’s used. Producers use samples—pre-recorded audio snippets—to create new music. These samples can range from a simple drum hit or a synth chord to a short vocal fragment.
This article will cover what samples are, how one-shots differ from loops, the main categories of samples, and some technical aspects, such as tonality, sample rate, and bit depth. Let’s break it down!What Exactly are Samples?
A sample is a recorded sound that producers can easily reuse in a music project. This can range from a single note or chord progression to a drum pattern, or even just an interesting sound. Samples are hugely important in many styles of music, particularly in electronic and hip-hop, where one-shots and loops play such a crucial role.
/
One Shots vs. Loops: What’s the Difference?
When working with samples, one is likely to run into both one-shots and loops. They serve different functions in the context of music production.
One Shots
A one-shot is a type of sample that plays only once when triggered. Normally, they are like drum hits, notes from instruments, or even sound effects. They do not have any sequence of rhythm that would compel the producer to stick to them.
For example, a kick drum hit, a cymbal crash, or an isolated synth sound.
Loops
A loop can be a really short piece of sound that repeats infinitely in cycles. Generally, loops have rhythms, chord progressions, or melodies set to repeat seamlessly to create a base for any song. Loops are essential for quickly constructing a composition because they consist of pre-formed patterns. They can be several bars long and are usually designed to match the timing of your project.

/
Common Sample Categories
Samples can be categorized based on the type of sound they represent. Here are some of the most common ones you may come across in most categories:
- Percussion: Kicks, Snares, Hi-Hats, and all the types of rhythm elements.
- Synths: Every type of pad, bassline, and lead-melody synth sound.
- Drums: Percussion but more oriented to full drum kits or single drums sounds.
- Vocals: Vocal chops, phrases, effects, or fragments of choirs that give brilliant general mix.
- FX: Effects such as risers, falls, sweeps, or any other SFX that provide texture and movement.
[code_snippet id=33 format]
Do Samples Have Tonality?
So a lot of samples do have a specific tonality. This is very important when you are dealing with melodies or harmonies, since the samples have to be in the same musical key as the rest of your project. In other words, a bass sample can be on a C if your track is on an E; you will like the tuning to go hand in hand. Melodic loops and chord samples are often key-labeled for easier production workflow. If you want to learn more about tuning samples, check How To Tune Samples.
Sample Rate and Bit Depth: Why Do They Matter?
When working with samples, there are two technical terms that will come in handy: sample rate and Bit depth. These will determine sample quality. Sample Rate:
The sample rate measures how frequently audio is captured per second during recording, expressed in kilohertz (kHz). Regular sample rates are 44.1 kHz (this is the CD standard) and 48 kHz (this is majorly for video). The higher the sample rate, the more detailed the audio will be.
Bit depth refers to how much information is packed into each sample. A higher bit depth means better quality and a larger dynamic range of the audio. The common standards for bit depths are a 16-bit, which will produce CD-quality audio, and 24-bit, which is standard for professional audio. A Bit depth that is higher will automatically imply that there is more precision in salvaging subtleties and nuances in the sound.[code_snippet id=33 format]
Why Are Samples So Important in Music Production
Samples have grown to become such a big part of modern music production for a number of reasons:
- Versatility: Sampled instruments can help you explore sounds that would otherwise be difficult or costly to create from scratch.
- Efficiency: Samples make it easy to put down ideas without necessarily having to record all the stuff yourself.
- Creativity: You can treat samples in layers to obtain sounds, textures, and rhythms.
Final thoughts
Knowing what samples are and how to use them properly will make a big difference in how you produce music. Whether you are using one shots to create some pumped-up beats, or laying down some loops to set the groundwork for one of your latest tracks, samples offer infinite creative possibilities. Mastering key concepts, such as tonality, sample rate, and bit depth, will enable you to put out better music.
Don’t be afraid to go out and experiment with how you can use samples to enhance your production![code_snippet id=33 format]